|
COMPLETING A GOLDEN HIND
by Richard Hare
sent in by Shane Baxter GH 'Pink Gin'
Buying the cockpit tent early made sense and fitting
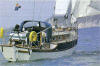
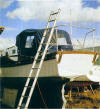
it was our first task. The next job was to fit the pushpit to provide us
with something to attach the ladder.

Amateur boatbuilder Richard Hare on fitting out 'Kepple', his GRP Golden
Hind 31 Maxi Kit.
COMPLETING A GOLDEN HIND
Readers of W14 may recall 'Kepple' left Golden Hind Marine’s warm, clean
workshop to arrive at Robertson's Boatyard, Woodbridge, in late November,
the worst time of the year for an eager DIY-er. In light rain she was
levelled in a muddy corner of the yard beyond the reach of the hose and
walked all over with gritty boots. I was returned rudely to the real world
of boat ownership.
It wasn’t all doom and gloom though. We had already put in a couple of
weekend’s work at GHM’s workshop beforehand. In dry conditions, we applied a
coat of epoxy paint to the un-pigmented GRP lower hull — un-pigmented resin
being both stronger and, importantly, translucent — and a coat of exterior
wood stain was applied to the Iroko external woodwork to afford some winter
protection.
Our first problem was how to deal with the rain forecast during 'Kepple’s'
two-day delivery journey and over the weeks afterwards. The problem was that
it would accumulate in the cockpit. We could not fit cockpit drains at this
early stage as we weren’t at all sure where the engine bearers would go.
The answer was to fit just one drain outlet to the cockpit sole before she
departed. Beneath this, GHM’s Mark Urry fitted a short length of hose which
channelled rain into a ‘get you home’ tank placed immediately beneath, so 'Kepple'
arrived at Woodbridge dry as a bone.
Had she been delivered in early summer I might have continued with this
arrangement until the engine was installed but with all winter ahead of us,
I decided to buy a standard Golden Hind 31 cockpit tent. It was already on
our list of things to buy later but the early purchase proved a
multi-benefit godsend during the notoriously wet winter of 98/99. Indeed,
the tent was the first thing I fitted to the boat, before she was even out
of the hoist.
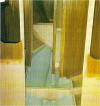
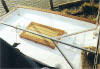
Above left: Forward of the saloon the plywood sole is surfaced with ‘4"
(6mm) maple strip, sourced from Robbins Timber.
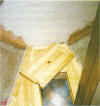
Above right: Squeaky clean on arrival, 'Kepple' came with her keel filled
and bilges painted. The woodwork had received a holding coat of thinned
varnish. Note the ply footings to which we attached our sole system.
The Maxi Kit
The Golden Hind Maxi-Kit is "intended for those with a reasonable starting
budget and average DIY skills." As such, I felt I fitted the bill. But while
I can see that this makes an ideal retirement project, I was concerned what
toll it would take on this middle—aged man at a busy stage of his career.
Fortunately, my wife Janie was keen to lend a hand and we live just five
minutes walk from the boatyard. I can nip along and fetch things early in
the morning and during lunch. In the evenings I can go down to the yard for
a couple of hours too. This proximity to the job should not be under
estimated: it can save years.
From previous house renovations, I knew commitment is the key to success and
this calls for slavish obedience to one simple but very effective rule: do
something that contribntes to the project every day. This usually means
evening work but weekends are the time that you can really make an impact.
It doesn’t matter if you only do a tiny bit each day so long as something
contributory is done.
Having the right tools at your disposal is also important. Apart from a
healthy array of hand tools, the following power tools are indispensable: an
electric drill, a drill stand, a jigsaw, an orbital sander for finishing, a
belt sander for stock removal, a planer and a router for straight-edging and
profiling. I’ve also had access to a pal’s universal woodworker with its
circular saw, planer and thicknesser. This enabled me to buy all my wood
rough sawn in large sections for machining up myself during the previous
summer before 'Kepple' arrived, producing Iroko lengths of 2" x 34" (50 x
12mm) for fiddles and trim; 1" x 34" (25 x 6mm) for edging and cover strips;
plus larger section stock for sole bearers. By the time she arrived, I had
stacks of the stuff; ready and waiting.
The hull, decks, cabin, cockpit and structural bulkheads were all done by
GHM — ‘externally complete’ to use their own phrase — and very generous
fitted woodwork was included, as also was the rudder, tiller, cockpit
gratings and even a comprehensive pack of related deck fittings, all
supplied loose. The schedule included other items like pushpit, pulpit,
stemhead fittings, chain plates, stanchions, cleats, fairleads, rudder
fittings and guardrail wires. Extras can be supplied fitted and I opted for
the cathead bowsprit and a sacrificial keel band as my mooring dries out.
So, all the exterior wood finishing and fitting out remained to be done.
Below decks I was confronted with a fairly empty void apart from the
structural bulkheads and woodwork, two half bulkheads, and the galley and
heads starter modules. Although the ballast was in, there was no floor.
However, there were the floor footings. These are plywood up stands, glassed
to the hull, located according to my agreement with the builder. They marked
not just the point where the internal joinery casts off at bilge level, but
also the line where the builder’s obligations ceased and mine began.
Work Plan
If you don’t have an overall strategy for a project like this you go crazy.
We all have our own ways of coping and mine was to think of the internal
fit-out as a sandwich. Let me explain: the slice of bread on top
included the deckhead and the cabin sides; the slice on the bottom was the
cabin sole and everything beneath it. The jam was the cabin void itself.
I completed work on the top slice by finishing off the internal joinery
around the hatches and fixing cover strips where they were needed, using the
Iroko mouldings prepared earlier. Everything was given a holding coat of
thinned Sadolin Holdex varnish, a PU/alkyd formulation and as such, a tough
varnish with sufficient elasticity for interior finishing, though not for
outside use. I also filled the interior deckhead screw countersink holes
using cheap and
cheerful polyester filler from the local auto parts shop. This completed,
Janie took over, painting the deckhead and varnishing the deck beams and
cabin sides. She finished the deckhead with Sadolin’s Superdec water—based
acrylic paint; it’s easier and more pleasant to apply than an oil—based
paint, it bonds very well to wood and two coats are all that’s required. It
doesn’t yellow with age either and it’s micro— porous.
The lower slice of bread is taking rather longer.
The lazarette was tacked first as fuel tanks and gas locker have to be
removed for the inside to be painted. Then there are all the fittings that
need to be added: pushpit, cleats, chainplates rudder pintles, ladder...
Photographs of the production Golden Hind 31, courtesy Golden Hind Marine.
I installed Iroko sole bearers and a plywood sole shortly after she arrived.
Great care is needed at this stage or you have to live forever with an
irritatingly undulating result. However, the Maxi-Kit makes this easy as the
three bilge keel braces that span the cabin athwartships are exactly
horizontal and in line with each other. Consequently, assuming you’re happy
to use these as your floor height, it’s a straightforward job to find the
floor height elsewhere in the cabin, and mark this off on the footings. For
the hardwood edges around the sole and for attachment to the footings, I
used 2" x I >1" (50 x 32mm) Iroko and for sole bearers I used 2" x 1 %" (50
x 43mm). The sole itself is X" (18mm) plywood, some of which is liftable for
access. Forward of the saloon, the plywood is surfaced with 4" (6mm) maple
strips from Robbins Timber, varnished with Holdex.
This also includes the water tank installation and here there’s been a
change of plan since the previous article. By the time a false floor was
placed above the keel — to allow water to run aft unhindered, as well as
providing a conduit for water hose — there was insufficient room for the 26
gallon (1001) Vetus and 13 gallon (501) Plastimo flexible water bags to fill
to anywhere near maximum capacity. So the larger bag has been relocated
beneath the aft end of the starboard saloon berth. with the smaller one
deeper down in the bilge. The idea is that the large bag feeds the small one
and not only will it give me full water carrying capacity, it also means
that I will no longer need two separate filler points.
When I move onto the jam of fitting out the cabin, to keep things manageable
I’ll start from forward and systematically work aft, finishing each section
to a reasonable standard as I go. In tandem, I’ve also run separate
programmes of outdoor jobs — fitting deck and hull fittings and Treadmaster
non-slip deck covering — and ‘homework’ — cutting Treadmaster panels and
varnishing, painting and staining components that I could take home when the
weather was bad.
LAZARETTE
This had to be sorted out early on for the simple reason that it’s best
done before the engine and all its ancillary equipment goes in. Since the
boat was supplied with a gas locker — Fire Resistant grade to meet the
Recreational Craft Directive — and two 15 gallon (551) diesel tanks already
fitted, the first task was to remove them; it only took a couple of hours
but it’s the last job I wanted to do immediately after receiving our new
boat. It was essential though: the whole area had to be painted and pushpit,
deck cleats, chainplates rudder pintles and boarding ladder fitted
before fixing the gas locker permanently. In addition, there are all the
engine ‘bits’ — exhaust hose, stern gear, fuel lines — to be run through,
the gas pipe connections to be attached to the lazarette deckhead and the
cable installed for the stern nay light. There’s a lot of work in this small
area alone.
With these five separate mini projects on the go simultaneously, there’s
never an excuse to relax. To be honest though, with hindsight I’m not
altogether sure that that’s such a good idea!
CONTACTS
Maxi—Kit:
Golden Hind Marine,
5a The Orchard,
Winfrith, Newburgh,
Dorset DT2 8NN.
Tel: +44 (0)1305 852713.
Fax: +44 (0)1305 854938.
Editors note. The phone numbers above
may be out of date as we have had difficulty trying to contact Mark Urry....
|