


|
Back under the kitchen table… In 1994, after 9 years sailing YM Senior 779 "Mikros", we decided to go a bit bigger. We found a YM Riptide under an apple tree in Yorkshire, bought her and set about rebuilding and sailing her. She was cavernous as photographs elsewhere on this website show very clearly. A drinks party of nine or ten could each have their own space in the saloon although she comfortably slept only 5. "Mikros" was pensioned off to my parent’s garden; 15 feet from where she had been built, by my father, 30 years earlier. It was our intention to sell her to a deserving home but when the time came my father declined saying that he would prefer to grow flowers in her. After 7 years sailing the Riptide "Thalia" we determined that we no longer had the enthusiasm to sail the long distances she deserved and sold her. We then went back to find "Mikros". She had suffered very little considering the interim years under debatable covers in the garden. In fact the trailer seemed to have suffered more! The wheel bearings were, of course, ‘shot’ and had to be replaced. I found they had only gone up 20% in the mean time! Three of the five (incl. spare) tyres had to be replaced because of perishing. The other two had only done a few miles. We had had to put new covers on them during the last trip to Cornwall in 1994 when a lorry had a blow-out just in front of us. We had had no option but to run over the wiry tyre debris. During the survey we also found that the sidebars on the trailer had rotted through. We guessed that saltwater had got into them and had not drained out. They were safe enough for the trip home but would need replacing in the near future. Other than that she was filthy…
We towed "Mikros" to Exeter and stored her on the Quay. We carried out a further survey… There were no serious structural problems. The main suspected areas of deterioration were to the deck and coach roof.
The deck. The deck had been previously painted with Interdeck but the paint was showing slight signs of cracking. As I suspected a problem with the ply under the paint, stripper was liberally applied and off it came. The deck ply looked fine but, just in case, I rolled on some West epoxy. I also epoxied the low toe rail on the edge of the deck. This is in a nice rich mahogany and it always looks very good with varnish although it can get knocked by toes… The deck was then painted with an undercoat and topcoat of white Perfection 709 with non-slip additive. See: "Deck Paint" and "Two-part epoxy paints."
Coach roof Some of the coach roof also needed attention. It has been varnished from day one and so has always needed regular care. It wasn’t the first time. A few years ago I had had to drill numerous holes and use something called ‘Kill Rot’, an epoxy solution. This soaked in very well and stopped the delamination. Previous over-winter use of heavy waterproof covers had caused problems by wearing off the varnish at an early stage before allowing loads of condensation moisture into the ply. I found that this ‘Kill Rot’ treatment had been very successful but years of gradual surface degradation meant that the ply was in serious risk of de-laminating again. The situation could be halted by an enthusiastic coating of epoxy over the problem area. I stripped off the old varnish and sanded everything after letting it dry completely. The epoxy was soaked into the ply and then re-coated twice to achieve a good result. When the epoxy had cured, I scrubbed off with ‘greenback and water’. One mistake I made was not to wash off the washings carefully enough. The treated area was fine but there were streaks down the cabin sides and I varnished these over without having noticed. Now I do – every day! When I re-varnished the coach roof I used rollers. This not only dramatically speeded up the process but also gave a very good finish. Whilst tittivating the deck and coach roof, I used any spare epoxy mix to treat little splits and areas elsewhere. Bridge deck locker leak. When my father built "Mikros" he made a bridge deck locker. He had the idea that he was going to fit a "Watermota" Shrimp single cylinder inboard engine in it. (The early 1970’s brochure is still in with the plans. £175 + £6.00 packing and carriage! Less 10% for money up-front.) I guess he didn’t get to do it but it means we still have a very useful bridge deck locker. There has always been a leak of water from the cockpit into the locker. I have never actually found how it gets through but it does. Loads of various gunges has been used in the past but this winter the leak was cured by soaking the join between the inside of the skin and the upstands for the locker with loads of "West". When that had ‘gone off’, I made up some more with colloidal filler mixed in. I filleted and faired off the whole area with the filler. It has not leaked since. I was concerned in case I was stiffening up what was meant to be a flexible joint but it seems okay. Tabernacle.
The mast tabernacle is made from sheet dural for the cheeks and other sections of the same material to hold it together and to the boat. Time and salt spray meant that parts were really badly corroded. I’m sure a metallurgist could let me have the answer but the outer hard case of the dural was fine but inside it was like sponge. Father still had spare pieces of the section from which I hand-cut and filed the required shapes. I then painted on several coats of Hammerite to give it some protection. I used their water based etching primer. That seems to be very good stuff and you don’t get the paint wanting to chip off as soon as look at it.
The mast. There is a joint halfway up the wooden mast (See photo of Mikros, above). It had always been a cause of concern in that when you gybed the mast tended to an ‘S’ shape. I had thought to provide a spreader to stay it but the mast joint was injected with epoxy under some pressure and then the mast and boom were coated in the epoxy before being re-varnished. The full details of this can be found in "Yachting Monthly Senior - options for rig re-design." Details of considerations of a bowsprit can also be found in the same article. I wanted to alleviate the weather helm problems and a bowsprit was one of the options at which I looked. The hounds are made of sheet stainless formed around the mast. There was a problem in that some of the holes for the rigging shackles had worn oval and were at risk of failing. As the original hounds were still very securely attached to the mast, I simply made second wrap-around version and secured one to the other with epoxy and self-taps. It is a seriously-strong fit. Undersides. The keels (centre stub and twin steel bilge keels) were cleaned off and re-primed with an appropriate Blakes paint. Loose anti-fouling was removed from the rest and any bare patches re-primed before a few coats of AF. Next winter I will a) remove all of the old anti-fouling, b) West epoxy the chines, c) drop the stub keel to check the bolts and, d) re-anti-foul. It’s had so many coats of different manufacture rushed on that I think it will be time to start again. Maybe it will stick better and not crack! Topsides. One or two ‘dings’ needed filling but for the most part the sides were in excellent condition. I had some white International ‘Interlux’ Super but not enough to do the whole boat. My friendly chandler said, "Oh they’ve just replaced that range with a single pot polyurethane called ‘Brightsides’" and so I had to buy new. It was however a very easy paint to put on and gave a good finish. Again I used rollers; tipping out bubbles as with the Perfection 709. See: Two-part paints for the process.Electrical wiring. I had always had some form of electrical gear on board. Eventually navigation lights, interior lights, radio cassette player, VHF Transceiver, were fitted over the years. Tony Showell once asked what a clip under the deckhead forward was for. "Oh the TV" was the reply! He still reminds me of the occasion. The upshot was that by 2002, I decided that the wiring could be better and that all of the additions combined into one system. It wasn’t dangerous but just tatty. I also happened to have a huge roll of suitable wiring left over from another job! See "Calculations on electrical wiring".I replaced the two old-ish 8W fluorescent tube lights with new ones that worked on either their own batteries or on the boats supply. I got new lights from B+Q that used AA batteries but tests showed that they used the batteries up fairly quickly and as there were 8 AA’s… I therefore fitted each lamp with a miniature single pole double throw switch and a power supply from the boat. Depending on which way the switch was set meant that you could use either the boat’s batteries or the light's own. Two other new lights that I fitted, one was over the stove and the other over the radios, had ordinary tungsten bulbs running on 6V. These lamps were round and were ‘push’ operated. You can get them in ‘Pound’ shops. Again I adapted them to allow running on boat or internal supplies but because they were 6 volts I connected the two together in series. You leave one switched on and when you switch the other on they both light up. Their light was not mega-bright but more than adequate. Batteries. Previously I had two ‘Mini’ lead acid batteries up in the forepeak. Did this add to pitching? I changed their position to one either side of the cockpit hard against the cabin bulkhead. I made some snug fitting boxes, which were epoxy lined so that if we did get an acid leak it wouldn’t get any further. These had carrying handles made from car seat-belt fabric ex. the local scrap yard. I made shelves in the cockpit lockers and one day I must strap the battery boxes down to them. I’ve towed her here, there, and everywhere and sailed her at some hairy angles of heel. The un-strapped batteries have never moved. The batteries have heavy gauge cable fused in the positive. Solar Panel When we had sailed "Mikros" before we had a 300mA E.C. Smith solar panel on the fore deck. I had transferred it to the Riptide and it got sold with her. Small solar panels won’t recharge a flat battery but it will keep a fairly well charged one topped-up. After a lot of hunting about I found that E.C. Smith didn’t do their panels anymore. Then more research and I plumped for a Solarex MSX 10L. As the number suggests this is a 10 watt (800mA) panel. It’s not as rugged as the ECS one but then again it’s a lot cheaper. It says it can be deck-mounted and can be walked on but in the handy instructions that came with it they advised that you shouldn’t walk on it! I fitted it on the foredeck just ahead of the cabin and close into the mast tabernacle. I also needed a diode kit to ensure the power goes in the direction it was needed. You simply connect it to the battery and it charges. In the winter with a thick blue cover on the boat and no batteries on board the panel still provided enough power to keep the flashing security LED on the CD player going! Small panels such as this one shouldn’t need any form of regulator but I leave that to the reader to determine. I found that with two brand new freshly charged batteries the panel took them over 14 volts on a hot sunny day. To prevent that you need a regulator but… New marine VHF and aerial. The previous set had seen better days and was huge compared with present day ones. I opted not to go for a DSC set up as I did not need/was not intending to have GPS. I opted for an ICOM IC-M401. It was good value. It had all sorts of facilities I wouldn’t use but so did they all. It really was small and tucked up under the coach roof just inside the cabin. The aerial was replaced although I can’t now recall the reason. The wooden mast on "Mikros" is hollow and so the co-ax cable comes down the centre. New CD player/domestic VHF radio. Again the old tape/radio set had been transferred to "Thalia" and was sold with her and so I took the opportunity to get a cheap-ish CD player from Comet (luckily also part of the same group as B+Q!). I built it a nice enclosure and fixed it next to the VHF just inside the cabin. Previously I had used a masthead aerial but later experience showed that it was simply not needed. I used a stubby rubber aerial laid horizontally on the next door shelf. The signal was perfectly OK. You can get aerial signal splitters to get both marine and domestic VHF from a marine aerial but I guess the £30-ish is not necessary. There were two car loudspeakers already in "Mikros". The enclosures were fairly naff and so I made up some nice wooden ones. Not only did they look good but the sound quality improved as well! Stove. In the very early days my father used to have a paraffin stove but that was changed over the years to a two-burner meths. stove in gimbals. I replaced that in the late ‘80’s with a single meths. burner but never did like the smell, which seemed to pervade everything. On one of the TV cookery programmes I saw a portable gas hob. It was a single burner with it’s own integral cylinder. I bought one from a local shop for £20 including some spare gas. The space on the boat was only just big enough but by replacing the screws that held on the little plastic feet with screws that went all the way through the feet, I simple screwed the whole thing down to the locker top. I then bent up some hard chrome plated ‘wire’ that I cut from one of Sandra’s grill trays. I bent these and fixed them to the hob so that they provided a four-sided fence. This kept the kettle/pans from sliding off. The hob proved very useful and efficient. My friendly surveyor said that strictly, even though I stored the cylinder where it could drain over the side, my fit didn’t comply with the ‘regulations.’ I was also concerned that the amount of heat generated, got the woodwork, above and behind, a bit warm in places but in reality this didn’t cause a problem. With four nights on board at various times during the season, cooking fairly substantial evening meals as well as breakfasts, I used about one and a half cylinders of gas.
Anchor and chain stowage. Previously I used to keep the anchor and the chain/anchorplait in a large red Addis box with handles. This used to stay in the cabin to be dragged out and onto the foredeck when required. This was always a problem. Having now removed the batteries from the forepeak, I was able to keep the cable in one part and the fresh water bottles in another. I put a chain pipe in through the foredeck and a fitting to hold the anchor ring whilst the tripping line eye was used to lash it lightly to the bowsprit. I have yet to sort the way in which the chain doesn't store itself in the locker properly but the whole new arrangement is a great improvement on the old one.
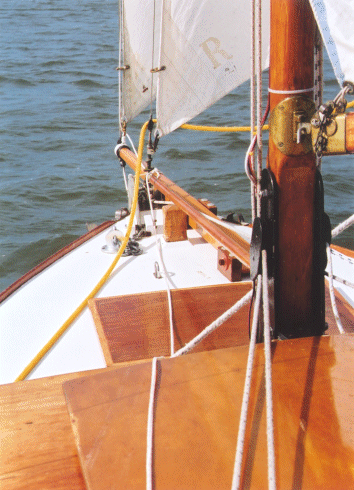
The spar laid fore and aft over the king-post in the picture is part of a mast lowering tackle which allows single handed lowering on the approach to bridges, power lines and so on – even when under sail. Bunks. Sandra threw out the old bunks and we had new foam inserts cut up at a local hardware store. They needed some trimming and, on advice, we bought a second hand electric carving knife. That it the ideal tool for cutting foam. Sandra then made up some covers from upholstery fabric. Very professional they look too and very comfortable they are to sleep on. We use a ‘throw’ to protect the bunk covers to prevent mucky/wet sailing gear from soiling them. We celebrated the new bunks by buying some new sleeping bags. Water supply. Later in the year I actually plumbed in some fresh water. Previously I kept 5 litre water bottles in the forepeak locker. When you needed some water you scrambled up and took one of the bottles out. It was then kept in the cabin to fly about at every opportunity. You needed a funnel to fill the kettle through the spout. About the time we found the Riptide I had already bought a folding tap that would fit into the washing up bowl on Mikros. The latter was mounted on the inside of the ‘door’ to the locker under the stove. It had a drain fitting in the base, which led to a skin fitting through the side at the waterline. When you open the door the bowl folds out… As I said I had already bought the folding tap and a small submersible pump which could be dropped into a water bottle in the forepeak. I now obtained some potable tubing to connect the two and taped a pair of wires to the pipe. I threaded the pipe/wires from the forepeak locker to the washing up locker by passing it under the frame pieces next to the hog. Some were a tight fit but it was easier than I expected. I fitted the tap to the washing up bowl. It wasn’t a perfect fit but it sufficed. I took a power supply from the back of a nearby accessory socket and fitted a push button (very small car horn button) next to the bowl. When I pushed the button out came the water! But when I let go it kept running! It was siphoning from the water bottle, which was slightly higher. A trip to the local caravan accessory shop: They knew of the type of tap and had an on – off valve to fit it. Now it works just fine but you have to watch not to be too generous with water because the pump will empty a bottle in next to no time. When one bottle is used, you crawl up to the forepeak and swap the pump to a new bottle. It’s far more convenient. and finally… Cost. You’re absolutely right, the cost of resurrecting the Senior (to my needs and standards) and running her for a year has been greater by far that the value of the craft but… and really finally… When I discussed some of the ideas and the problems with Tony Showell, a very long-standing authority on Seniors, he was interested in my move back from a Riptide to a Senior. His comment was: "Welcome back under the kitchen table…" I leave the reader to work that one out.
Geoffrey Hyde Fynn YMS 779 "Mikros" March 2003
|
|
|
|
|