![]()
Senior 'Bethem'
|
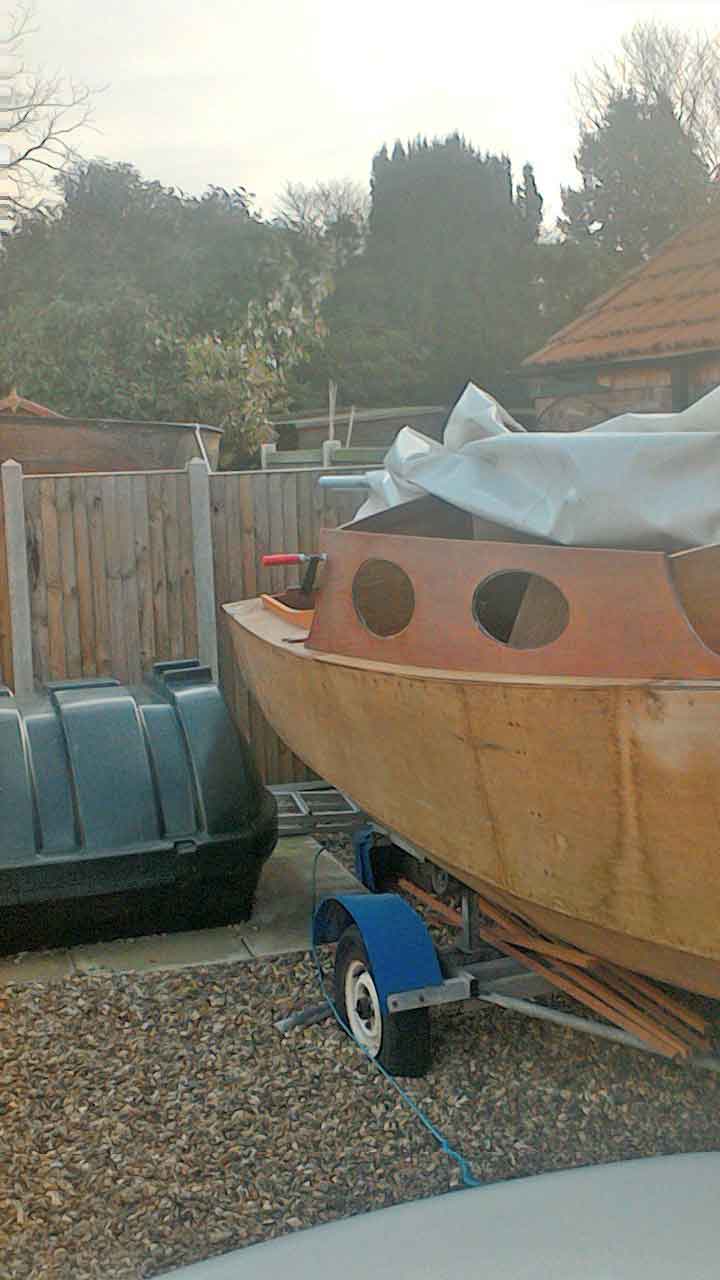
'Looking through some old photos found the one's regarding the first Senior I had, named 'Halfpenny Breeze'. She was found in the usual unloved state at Burgh Castle Marina in Norfolk and a I persuaded a friend to take her on. After a rapid paint job she was launched and sailed a couple of times, then, without my knowledge appeared at a local auction, which I attended. Didn't reach her reserve so I put in a bid and found myself towing her the couple of miles home. From memory a new cabin front, roof and cockpit locker lids were the only structural things to do, then strip all paint off and re-apply. She seemed stable with her three keels and Bermudan rig and sailed ok on the broads except when beating, she just did not have enough grip on the water and whatever I tried she would not point particularly well. However for short tacking on the broads I've been spoilt with Broads yachts so I was perhaps expecting too much from the Senior. She was eventually sold to a chap who, I believe, got together a small fleet of Seniors and hired them out on the broads. (Yes he did and I recall a friend of mine, Richard, hiring one for a week, could have been yours!) I continued chopping and changing boats, often restoring them from complete wrecks, and built a couple of dinghies. Now with a wife and two lovely daughters we were looking at cheap family holidays and after suggesting a complete change from the broads we went camping, and re-discovered all those nice Suffolk and Essex rivers. The family took to it well and enjoyed the change of scenery and last year we took a trailer sailer with us on a trip to Tollesbury. Although we only managed a couple of outings on the boat, being back on the River Blackwater bought back happy memories, so I started looking into the possibilities of buying something bigger to keep down there during the season. Back to reality and concluded mooring fees, leaving the boat unattended far from home and restricting where we could reasonably expect to go during a weekend, settled on a compromise by keeping the camping gear and finding a suitable, easy to trail, launch and day sail trailer sailer. Life turns full circle, and it just so happens that I had purchased, during many mood swings, plans for the YM Senior, 3 Tonner and Eventide back in the 1980s, so I dug out the Senior plans and started doing some rough costings. Whilst sourcing materials on the internet I came across an advert for a part complete Senior, and after making contact with the owner, he sent me photos of the work to date. She is a credit to the builder David, he has used iroko for the stringers, marine plywood for the skin, and solid teak for the transom. The hull was complete with main cabin bulkhead, cabin front, some deck beams and cockpit seat sides all present. With the assistance of my work colleague, along with the firms vehicle and heavy duty trailer we drove the 340 miles to collect her and she now sits waiting for completion, back at our yard in Norfolk. As with most of my boats from the past I like to keep a diary of work along with many photographs and with John's encouragement am making this one more public by having a builders page. I shall do my best to keep it updated. cheers Mat Gravener' Senior Rep EOG!
|
|
|
|
March 2017. Good progress made on the Senior to date. The plans specify the rudder to be aluminum plate, but I had a very nice piece of teak which I profiled to form the blade and 12mm marine ply for the cheeks. As the blade is lowered it touches the bottom edge of the cheeks so I let in a piece of teak here to protect the end grain of the plywood. A stainless steel pivot bolt completed the basic assembly. The interior of the boat is being sanded to remove any epoxy glue runs and to further protect the ply I've started coating it with a two part solvent epoxy. Its very easy to apply by brush or roller and can be worked into all those awkward places. Its an ideal product on bare timber as it soaks right into the grain. Its worth mentioning that the area needs to be well ventilated as its fairly potent stuff! Because we will be towing the boat a lot I've decided to go for the centreplate version, with the addition of removable internal lead ballast. This will be cast in small ply boxes and secured either side of the centre case and can be removed if necessary. I have received prices for the centreplate, in both galvanised mild steel and stainless and was pleasantly surprised. This will be made exactly as specified on the plans, with the curved slot to allow a stop bolt in the casing and the lifting lugs. The casing has been drawn out onto a sheet of 12mm Robbins Elite plywood and spacers and logs are utile (mahogany substitute). Once assembled I shall evaluate the strength and if necessary can clad the casing in additional strips of hardwood. I have managed to get hold of another trailer, which is much more suitable and will make launching and recovering the boat easier. I have also added up the weight of lead which I've been collecting over the years, mainly old mast weights from Broads Yachts and I have enough to cast 160lbs of internal ballast for the Senior if need be. regards Mat Gravener
The extra internal ballast will be a great idea, they do need it. John
|
|
|
Sorry for lack of recent communications! Been busy replacing decks and marking out new mahogany cabin sides on my 1919 30 foot broads river cruiser, which is going to be my very last restoration! Bethem, the Senior is nicely wrapped up in a heavy tarpaulin, on her new trailer waiting patiently for a space in the workshop. I have some very nice, long lengths of mahogany and have sliced some up for various bits for the Senior, these include trunk logs, cappings, mast supports, foredeck rails and cockpit floor bearers. These are stored flat in my workshop at home. Apart from a few sheets of Elite marine plywood I think I now have all the timber to finish the boat. Eventually I would like to rig her as a gunter cutter with short bowsprit, but recently picked up a good set of heavy dinghy sails, Bermudan, for the princely sum of ten pounds! So, along with the aluminium mast I had kicking about, and some brand new shrouds, I now have a complete (temporary) rig. Will update with photos of the made up teak rudder and brand new galvanised centreplate soon, regards Mat Gravener |
|
|
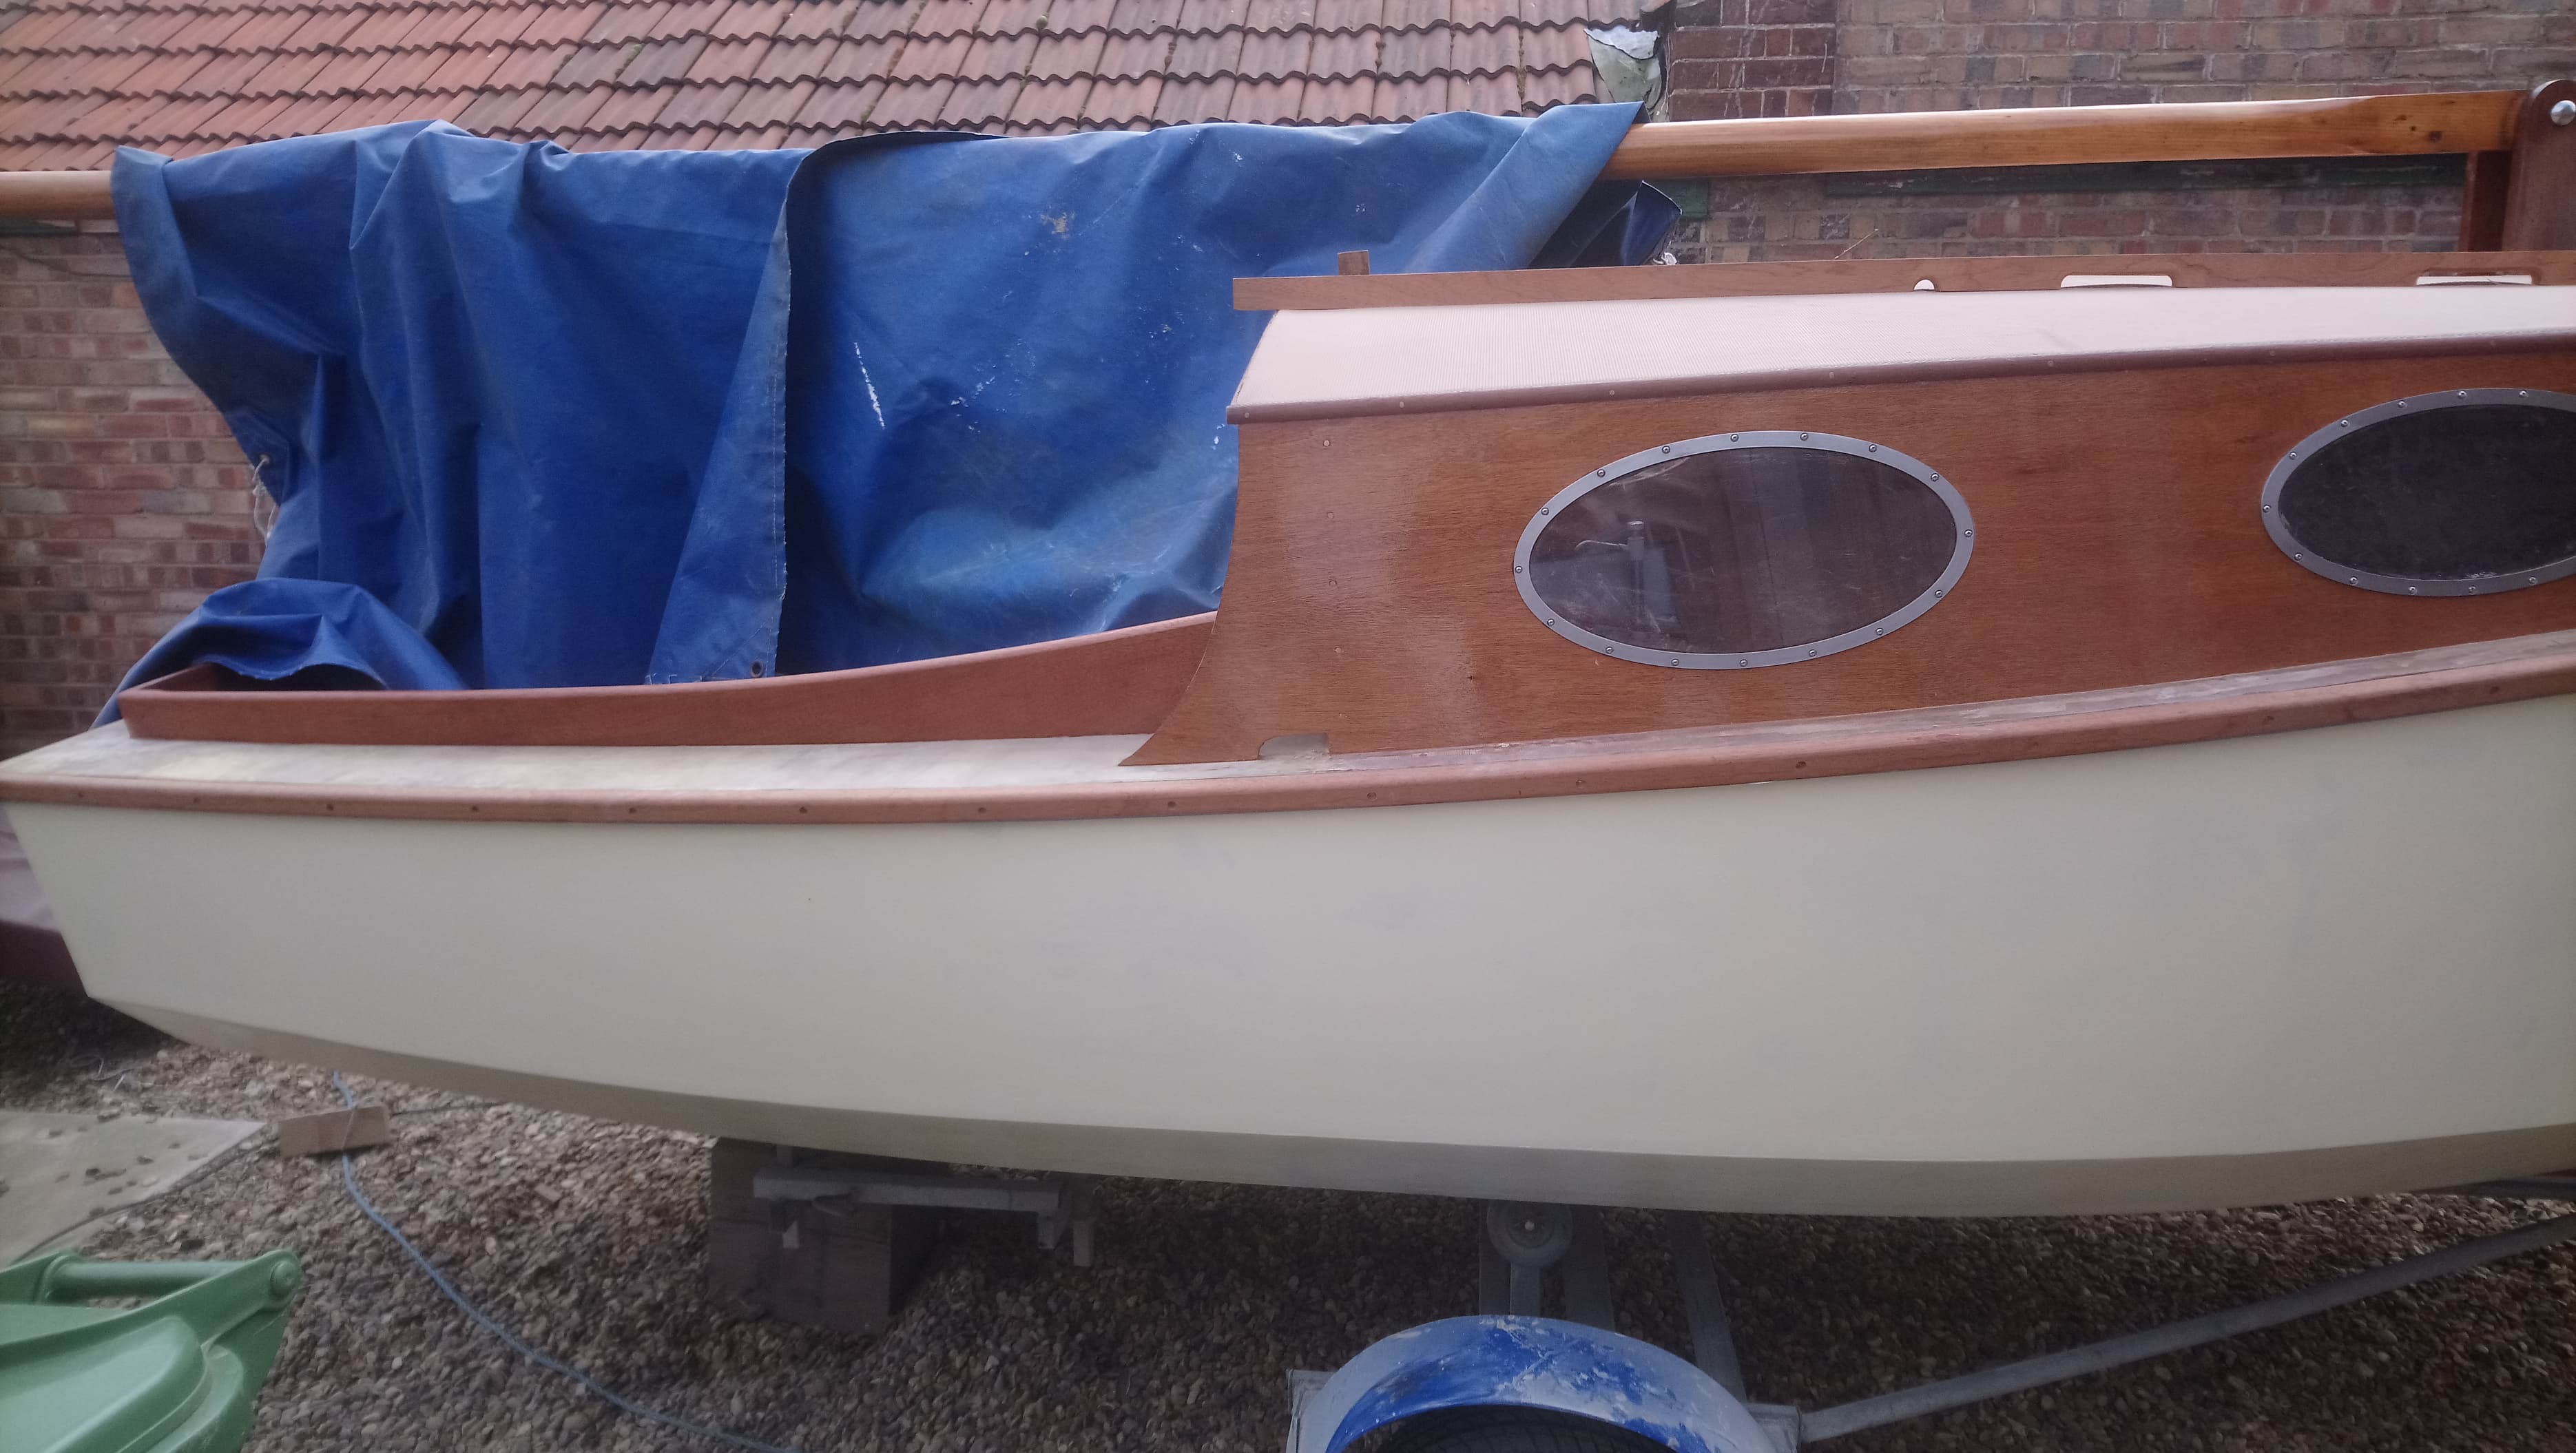
'26th August 2017, decided it would be a good idea to get Bethem moved to our drive so I could actually start working seriously on her. Made sure she was well strapped down on the trailer and made the 10 mile journey back to our house. Making use of the good weather sanded the remaining parts of the cockpit and transom, then applied two pack solvent epoxy to the ply and teak transom. Areas inside cockpit lockers and under floor were given a coat of grey easy-primer, a marine product which we use extensively at the yard. Very easy to apply by brush or roller and can be used on most surfaces. My newly made rudder has had a number of coats of varnish. A rather sad looking Senior, which was broken up recently, provided a mast, gaff and boom in good quality timber and this has been stripped and given a couple of 50/50 varnish coats. The mast carries a full length track as per the original gunter sail plan. I have numerous sails to try out on the boat, and looks as though to start with it will be gaff rigged, although that is a long way off. Mat Gravener |
|
|
17th September 2017 Couldn't keep putting it off, so Sunday 17th September 2017 drilled out a series of holes through the hog and keel and cut out the centreplate slot! It worked out really well, just a bit of cleaning up with a sharp chisel where the jigsaw blade had wandered a little.
Mat
Gravener |
|
|
28th October 2018. Another update from Mat!.. Anyway thought I'd give an update on the Senior Bethem and a pdf. file showing the final rig set up. The centreplate case has now been fitted using plenty of Sikaflex and 3x10 stainless screws, this all pulled down well and a consistent bead of sealant squeezed out all round the joint. Next I turned my attention to the decking, most of the foredeck beams were already in place, although I did have to add some tapered spacers to get the crown right, and I also added a 3 x 1 mahogany king plank. Hull edges were bevelled and a framework, as per the plans, was assembled and fitted round the cockpit for the side decking. Two 'V' shaped pieces planed up to fit to the inwales for the cabin sides to fit to, these started off with a constant bevel but once fitted they needed truing along their whole length for the sides to fit accurately. 9mm marine ply has been used for all the decking, with a join down the centre of the foredeck. Glue and bronze annular ring nails used to fixed them to the various beams. A clearance hole and very small countersink ensured the deck pulled down closely to the beams. Some nice offcuts of mahogany were shaped for cockpit coamings and a trial fit done. I'm extending these onto the stern deck with some blocks on the inside faces as a landing for the boom crutches. The back coaming was shaped and to get a clean curve I attached a batten to the top and used the router with a bearing guide. The galvanised centreplate was tackled next. From the plans I took measurements from the bottom of the plate both ends to the outside of the keel, I then added the depth from the keel to the central bar on the trailer and cut two pieces of timber to rest on the trailer and go up inside the casing. Next the plate was lifted into the boat and tilted into the case, the stop bolt was pushed through and a temporary tackle set up from the lifting lug. After a bit of shunting back and forth of the plate the pivot bolt lined up and pushed home. I have finalized the rig and have most of it, including the sails, spars and running rigging, this is shown on the drawing. That's it for now, should be in a position to provide more regular updates! regards Mat Gravener
|
|
|
November 2018.
Another update on Bethem with pics. |
|
|
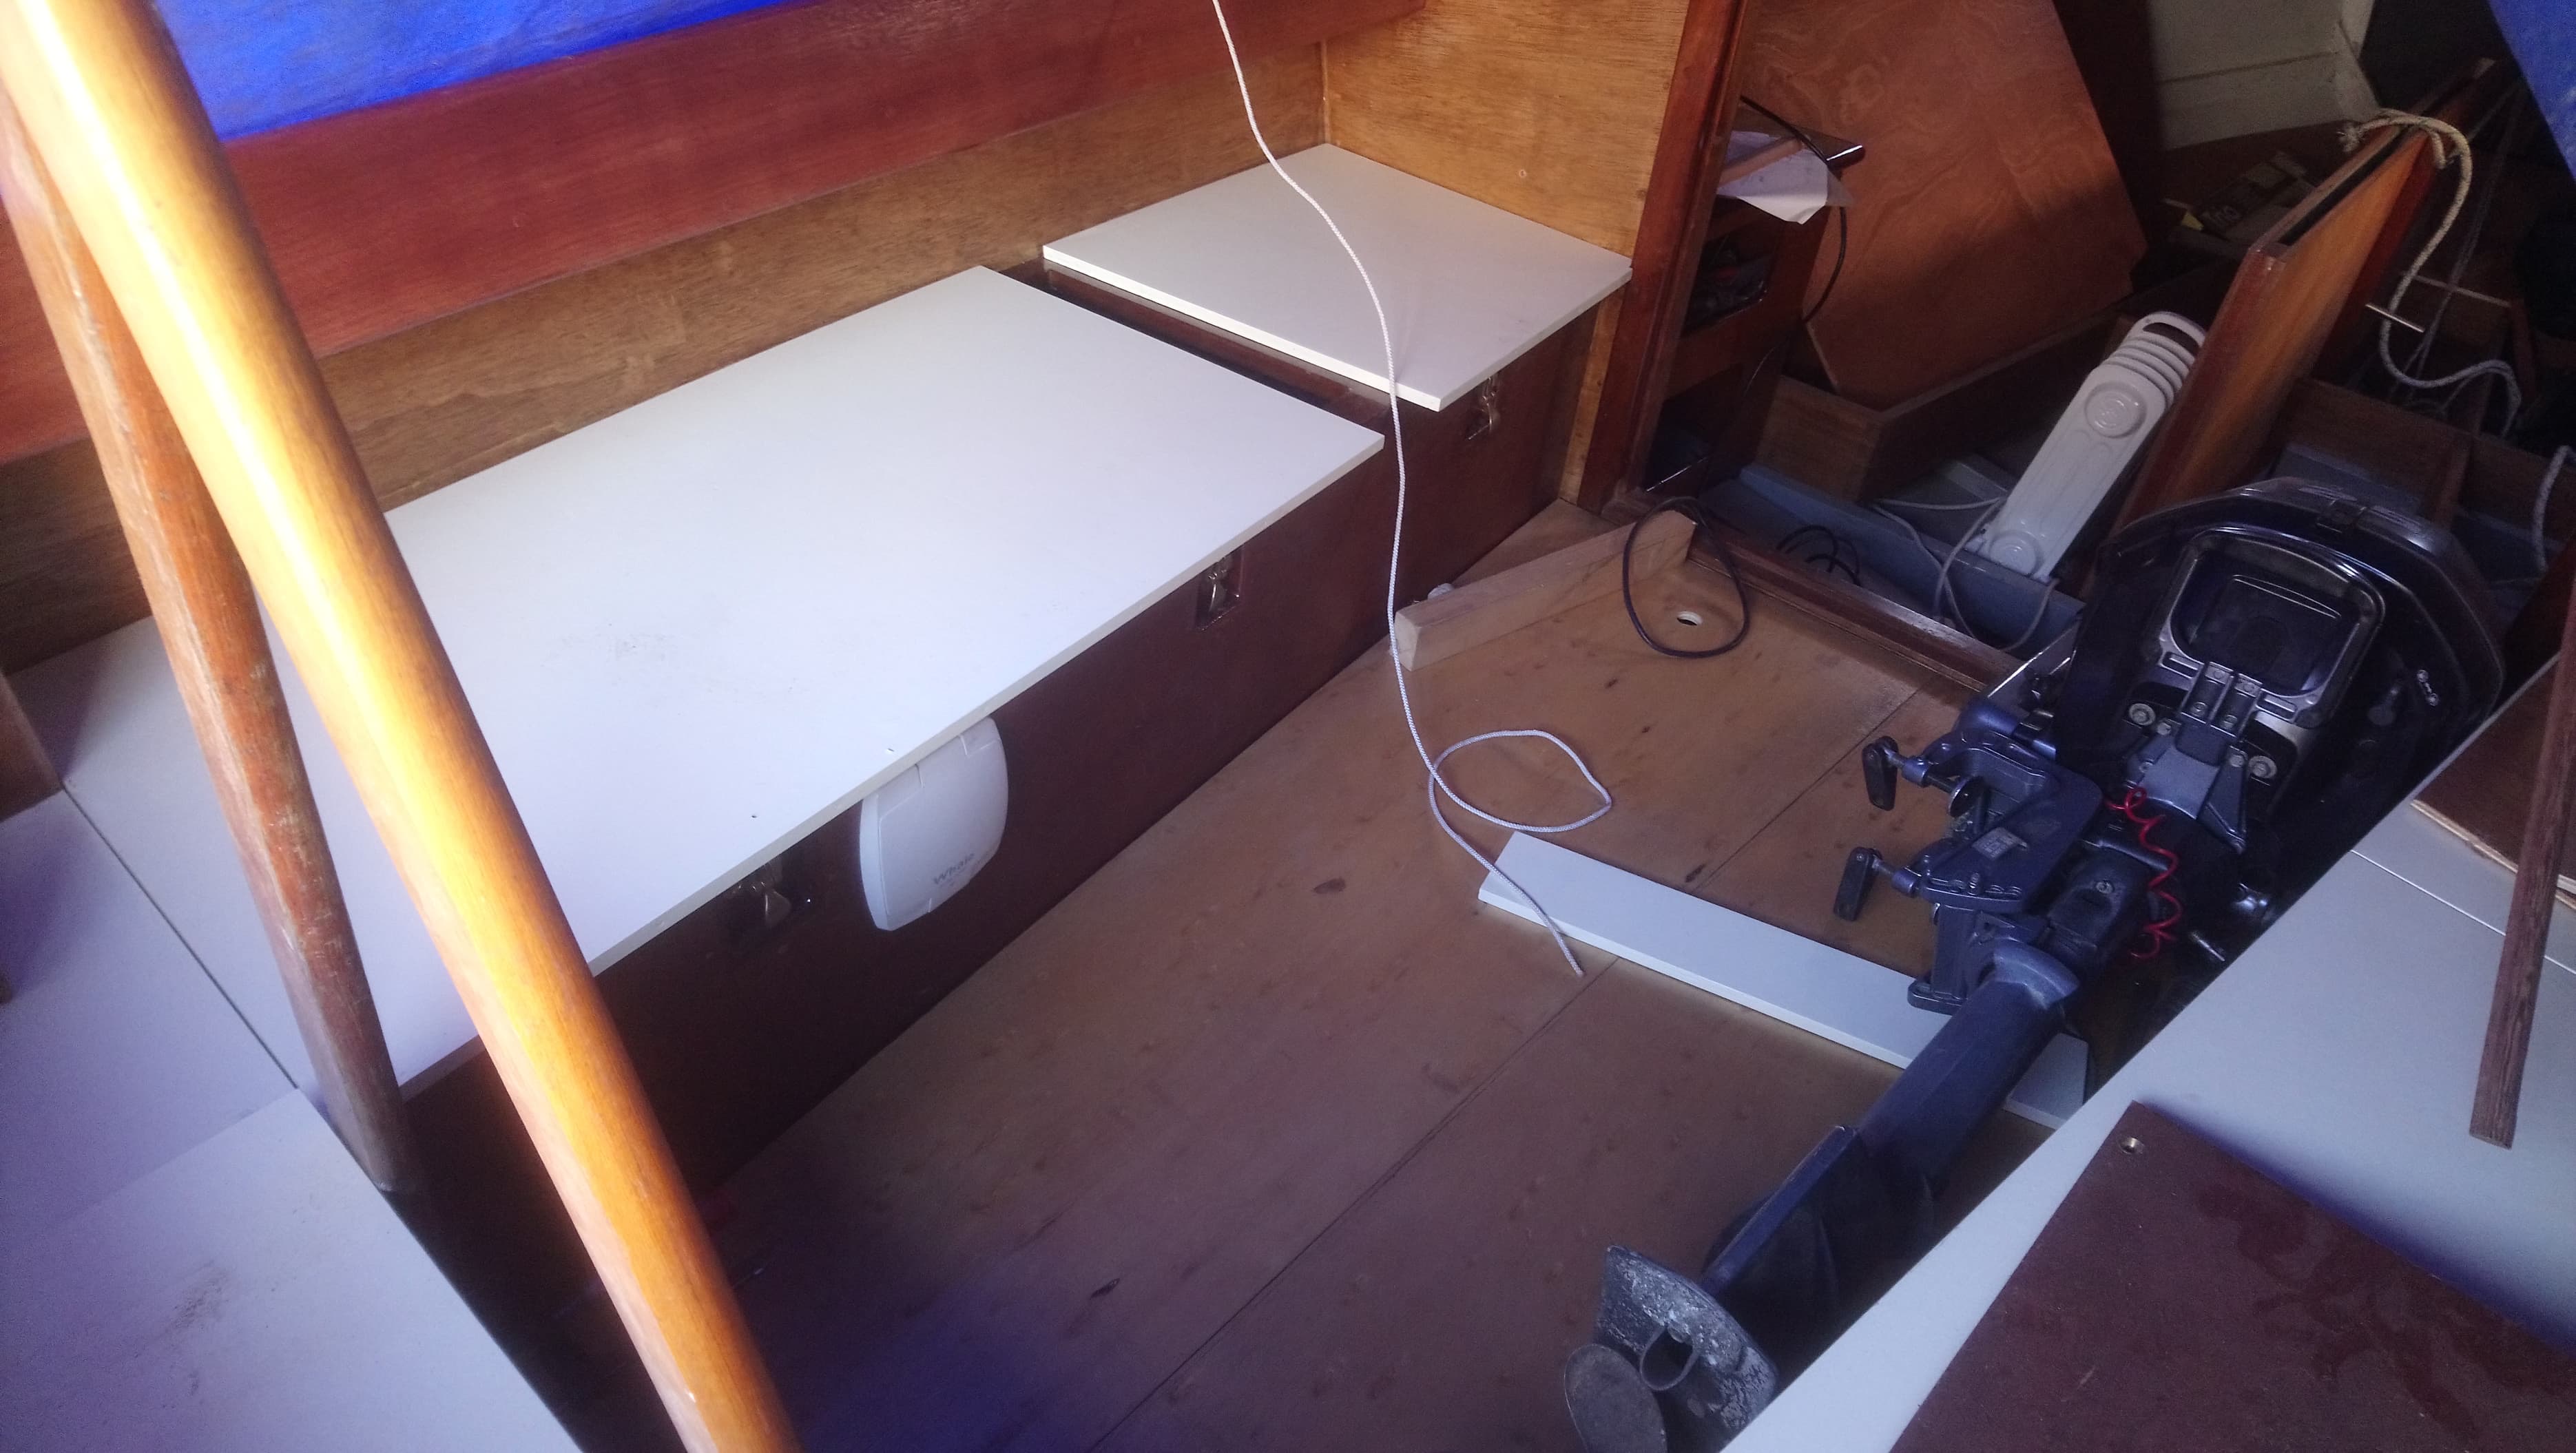
January 2019. Been busy on Bethem. She now has a cockpit floor and the last few days I have been sorting out the galley area, which apart from some rather challenging angles all went together rather well. I'm currently working my way through all the offcuts of ply and mahogany I have and putting together as much as possible before ordering any more materials, this is one of the benefits of a small boat, the bits would be useless on anything bigger.
Attached are a couple of photos showing the galley, was worthwhile adding a shelf in the small locker, and the two cut outs are large enough, just, to put tinned food, cutlery and crockery in! The top will be constructed from a couple of pieces of mahogany tongued together with a round over on the front and side edges, then all coated in Bonda seal and varnish.
|
|
|
April 2019.
Update of the Senior Bethem with a few
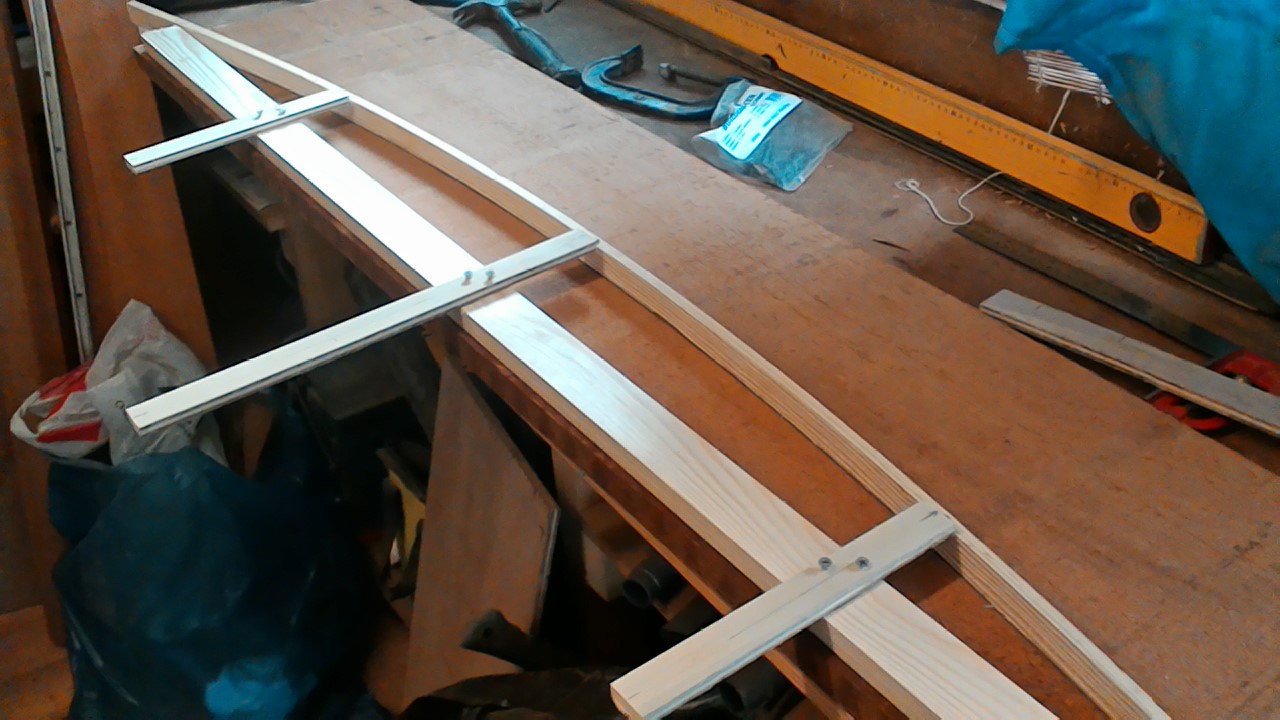
photos, seriously hoping to have her in the water some time this season! All the decking has been coated with epoxy and 300gm woven roving cloth, then a further coating of epoxy with fairing filling added. After a gentle sand they have come up very well. Cabin sides had scuppers cut into the front and aft ends, then epoxy and stainless screws to fix them in place. Bronze annular ring nails were used into the teak cabin front and main bulkhead. Next I made up the roof beams out of utile, to start with a batten was laid over the main bulkhead which gave the curve of the roof, three string lines were attached to this and the cabin front, pieces of 2x1 were clamped to the beam shelves in the beams final position, then offcuts of ply were attached to the 2x1 with their top edges touching the string line. These were then laid onto the utile board and top edges marked, a flexible batten used to get a fair curve onto the utile. I cut outside the line using the jigsaw then set up a router and used the batten to act as a guide for the cutter, it was then easy to measure down from this line to get the curve for the bottom edge of the beam, half laps were put on the ends to lock them into the beam shelf. They were then given a radius on their bottom edges complete with stop chamfers, these produces a neater join with no rounds to cut. All this lot were epoxied and screwed in place, then a lot of chamfering done with a newly acquired smoothing plane. The roof sections are made from three pieces, the main centre piece from cabin front to hatch beam, then two side pieces added and overlapping the main bulkhead. After shaping and drilling fastenings the undersides were treated with Bonda seal, followed by two undercoats and two topcoats of white paint. Fixing down with marine sealant/adhesive and stainless screws. All went well. In the cockpit I have cut through the stern locker bulkhead and extended the deck back to form a seat with additional locker space, this was the arrangement on my previous Senior and makes access to the outboard bracket easier without having to reach far, it also allows more than two people to sit in the cockpit! Went to the annual Norfolk boat jumble and picked up all brand new running rigging for 30 quid! That's one of the nice things about a small boat, offcuts no good for anything else seem to be the right size for the Senior! Mat. |
|
April 23rd 2019. Got on well with the Senior over the weekend, and will send another update soon with some pics, I had some genuine Trakmark left over from one of my restorations and covered the roof with this, after a bit of scheming I managed to get the joins underneath the hatch runners, which I made up from mahogany and incorporated a good sized drainage hole where the hatch stop will meet the edges and a couple of hand holds as well. Mat.
|
|
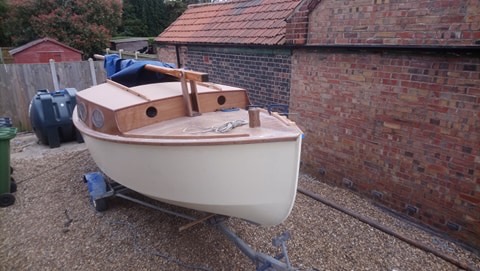             |
April 2020....
So, its been a whole year since I last wrote about Bethem! With so many
other things going on last year work on the Senior has been sporadic.
Due to recent world events the recent company I had joined have closed for
the time being, and although we are half way through a garden makeover, and
replacing the hog and garboards on the broads yacht I have found time to get
going again. Week later.... Bethem has now had her
final two coats of gloss on the topsides, Toplac Snow White. Decks painted 3 coats of clear epoxy, 3 coats of
Hempel multicoat and one coat of International Deck paint. Portholes and windows fitted, mast support posts,
centre plate pivot, stop and pulley block all fitted. Sliding hatch epoxy
coated, just needs varnish. Repainted interior with white multicoat and now about
to refit the interior back in, I want to make this removable for easier
maintenance.
|
|
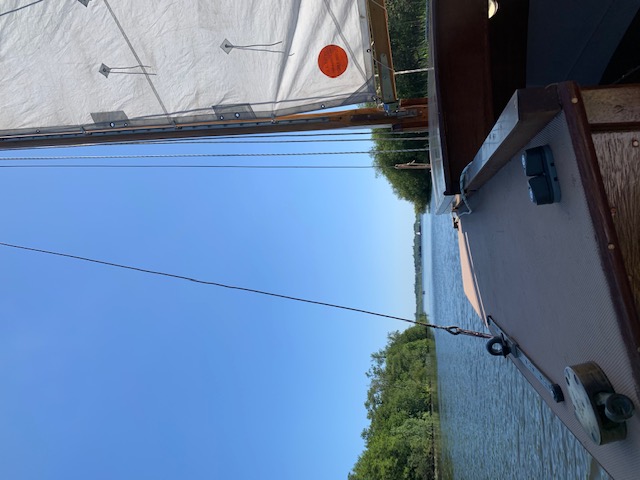
Launched at Barton Turf where I work. No leaks anywhere, very pleased the centre board
case is ok! I had left the jibs at home, but we managed to take
her out onto the Broad under engine and hoist the main, first impressions is
she moves well, is surprisingly stable when moving around, and best of all,
the lovely comments from other boat owners, most of whom have never heard of
the Yachting Monthly Senior! There is, of course, bits to finish, but so far both
my wife and I are happy.
|
|