The Eventider's News
Issue Five Autumn/Winter 2005

Page 7.
Holding Tanks
Page One Fram update The Webmaster Paint Offer Molly Jade Scran Bag!
Fiddler's Green goes Green!
When we are anchored in a tiny creek, or moored overnight in a marina, or as last year, 2004, enjoying the delights of the inland waters and canals of Holland, I have oft though it would have been nicer on the environment, safer and more convenient, to be able to use our own facilities. In the marina flushing the loo is not a very nice practice, in tiny creeks it can be equally unsavoury, especially if you fancy a swim! On many inland waterways it is quite rightly forbidden.
The added convenience, sorry about that one, of not having to trapse half way round a strange marina in the middle of the night is bliss!
Now having completed the job, ( no not going there!) and even though it has only been really used for 3 months, due to me being crocked, it has been a resounding success. I wish I had built it in from the start!
 The starting place has
to be the loo itself. If you have, as we do, a Lavac, you are nearly
halfway there already! The Lavac used one heavy duty, simple pump, has
minimum fuss, no tiny valves and widgets, just a simple sealing lid and
seat. Close the lid, pump the handle and you pump out, creating a
vacuum that sucks sea water in via the inlet seacock to flush. the
vacuum is released by a slow leak of air into the suction side hose.
After a short time you can lift the seat to use the loo again. ( We
have also a small fold up sink, emptying via a hose and small valve, into
the suction hose, thus into the loo, a couple of strokes on the pump empties
the waste water from the bowl. It has the added advantage that the vacuum in
the loo can be instantly released by turning the valve under the sink on for
a few seconds, thus the loo is back into use immediately, no wriggling
whilst you wait for the vacuum to go!)
The starting place has
to be the loo itself. If you have, as we do, a Lavac, you are nearly
halfway there already! The Lavac used one heavy duty, simple pump, has
minimum fuss, no tiny valves and widgets, just a simple sealing lid and
seat. Close the lid, pump the handle and you pump out, creating a
vacuum that sucks sea water in via the inlet seacock to flush. the
vacuum is released by a slow leak of air into the suction side hose.
After a short time you can lift the seat to use the loo again. ( We
have also a small fold up sink, emptying via a hose and small valve, into
the suction hose, thus into the loo, a couple of strokes on the pump empties
the waste water from the bowl. It has the added advantage that the vacuum in
the loo can be instantly released by turning the valve under the sink on for
a few seconds, thus the loo is back into use immediately, no wriggling
whilst you wait for the vacuum to go!)
 First I had to find a place to put the
tank. It had to be a reasonable size, 10 gallons plus, enough for
about 5 days for two of us, more if you are selective about what you put in
it, if you get my drift! Measure twice.!! You could do worse
than make a cardboard and sticky tape mock up. Remember to leave
enough room on top for the bends and hoses, 5" in my case.
First I had to find a place to put the
tank. It had to be a reasonable size, 10 gallons plus, enough for
about 5 days for two of us, more if you are selective about what you put in
it, if you get my drift! Measure twice.!! You could do worse
than make a cardboard and sticky tape mock up. Remember to leave
enough room on top for the bends and hoses, 5" in my case.
![]() The space forward on the port side, as close as I
could get to the loo compartment was the choice. In this space I had a
spare 3rd anchor, 25lb, 2 gallons of water,
20lb and several lengths of rope. The anchor was taken ashore, the
water and the rope relocated.
The space forward on the port side, as close as I
could get to the loo compartment was the choice. In this space I had a
spare 3rd anchor, 25lb, 2 gallons of water,
20lb and several lengths of rope. The anchor was taken ashore, the
water and the rope relocated.
I figured that the tank could weigh 100 lb full, but would only be full in marinas, inland or in sheltered water. At sea it would be pumped dry, so would weigh just a few pounds. I could live with that.
 Surfing the net,
checking PBO then phoning round I found prices for tanks ranged from over
£500 to £180. Guess which one I chose! Blackwater
Plastics, a local company, meant I could drop in to chat, see any problems
and get advice.
Surfing the net,
checking PBO then phoning round I found prices for tanks ranged from over
£500 to £180. Guess which one I chose! Blackwater
Plastics, a local company, meant I could drop in to chat, see any problems
and get advice.
 Colin and his lad
did a good job. I had purchased all the fittings I needed, hose tails
etc, from Lee Sanitation. they also provided diagrams and smell proof hose,
(more on that later!) The inspection hatch meant the top had to be
smooth, as the rubber seal was on the outside of the tank. this meant
the top was upside down, as the smooth side is normally inside, to prevent
sticking!
Colin and his lad
did a good job. I had purchased all the fittings I needed, hose tails
etc, from Lee Sanitation. they also provided diagrams and smell proof hose,
(more on that later!) The inspection hatch meant the top had to be
smooth, as the rubber seal was on the outside of the tank. this meant
the top was upside down, as the smooth side is normally inside, to prevent
sticking!
 The spacing of the
fittings depends on the length of the tails, you have to leave enough room
to screw them in, so measure up first. The outlets, suction pipes, and
I have two, (one for onboard pump out, the other for shore pump from the
deck), must go to the deepest part of the tank. I have fitted a
3/4 inch flush at the other end of the tank. There is also a hole for
a 'Full' gauge, an electric device that lights a small light in the loo when
the tank is nearly full. Cost £50.00, but I thought it worth it
The spacing of the
fittings depends on the length of the tails, you have to leave enough room
to screw them in, so measure up first. The outlets, suction pipes, and
I have two, (one for onboard pump out, the other for shore pump from the
deck), must go to the deepest part of the tank. I have fitted a
3/4 inch flush at the other end of the tank. There is also a hole for
a 'Full' gauge, an electric device that lights a small light in the loo when
the tank is nearly full. Cost £50.00, but I thought it worth it
 .
Sketch of
the top of the tank. My ideas for placing the fittings. Compare
this to the actual top, a bit different.
.
Sketch of
the top of the tank. My ideas for placing the fittings. Compare
this to the actual top, a bit different.
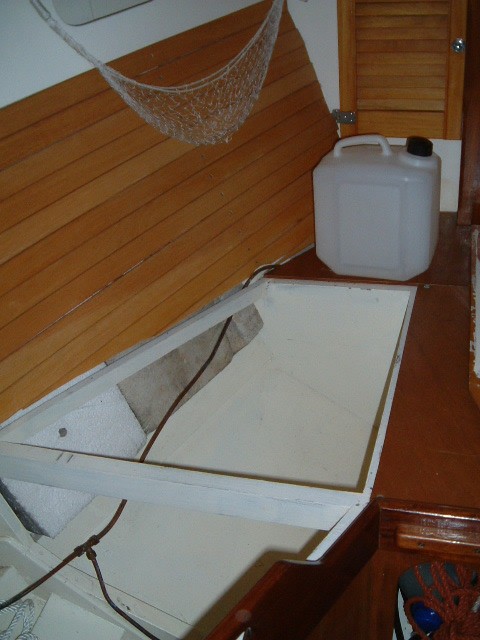 The area under the bunk,
ply top removed, the 2 gallon container gives an impression of the size, it
is also a very odd shape! I had the tank made to allow for packing it
out with foam.
The area under the bunk,
ply top removed, the 2 gallon container gives an impression of the size, it
is also a very odd shape! I had the tank made to allow for packing it
out with foam.
 I used polystyrene foam
ceiling tiles!
I used polystyrene foam
ceiling tiles!
 Glued with Sikaflex, and
roughly broken to shape, they were perfect for the job.
Glued with Sikaflex, and
roughly broken to shape, they were perfect for the job.
 They look a bit rough
round the edges, but the tank is well protected. Don't forget there
can be about 100 lb weight in there.
They look a bit rough
round the edges, but the tank is well protected. Don't forget there
can be about 100 lb weight in there.
 The pipe fittings are all plastic, BSP thread and sealed with PTFE
tape and a smear of Sikaflex.
The pipe fittings are all plastic, BSP thread and sealed with PTFE
tape and a smear of Sikaflex.
 One
very critical point to think of is the max width of any doorways the tank
will have to come through. I carefully measured up the companionway,
but forgot there were other doorways!
One
very critical point to think of is the max width of any doorways the tank
will have to come through. I carefully measured up the companionway,
but forgot there were other doorways!
 Opps!!! With a
little jiggling it will go through, I think!
Opps!!! With a
little jiggling it will go through, I think!
 Well it did, other wise
I would have had to take the loo door off its hinges! As it happens I
had to take it off anyway later, but do check if you fancy a large tank!
Well it did, other wise
I would have had to take the loo door off its hinges! As it happens I
had to take it off anyway later, but do check if you fancy a large tank!
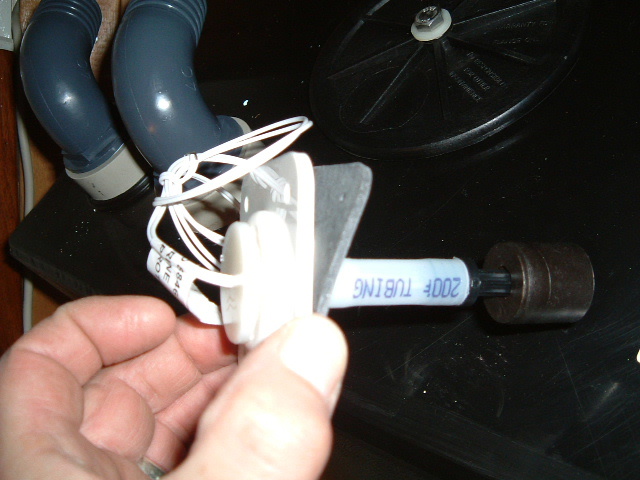 This
is the sender unit for the gauge, it is a simple float switch.
This
is the sender unit for the gauge, it is a simple float switch.
 As
with all the fittings, great care is taken to ensure a good seal! The
last thing you want is a smelly leak!!!
As
with all the fittings, great care is taken to ensure a good seal! The
last thing you want is a smelly leak!!!
 Trial fit, the hose tails all arranged to point the right way and the
packing, tiles, slid in place.
Trial fit, the hose tails all arranged to point the right way and the
packing, tiles, slid in place.
 The Sender fitted.
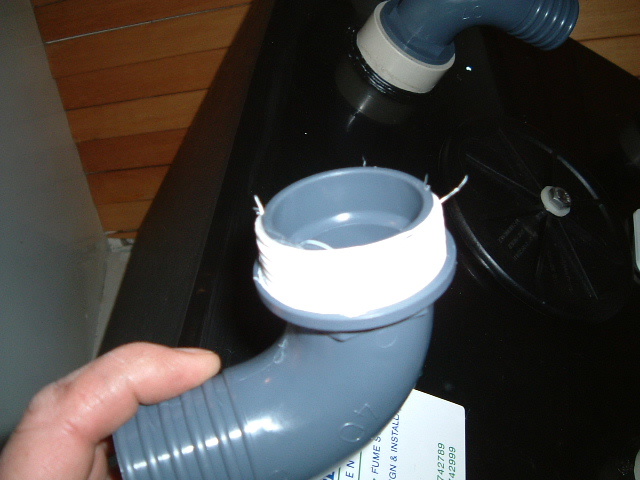
 It took a lot of courage
to use the hole saw on the deck! A pump out, 1&1/2 inch and a flush,
3/4 inch. Fittings from Lee Sanitation.
The Leading Specialist in Marine
Sanitation
It took a lot of courage
to use the hole saw on the deck! A pump out, 1&1/2 inch and a flush,
3/4 inch. Fittings from Lee Sanitation.
The Leading Specialist in Marine
Sanitation
 To secure the tank
down I used webbing strap, similar to my jackstays... In fact they were once
my old ones! The pic left shows the straps where they cross the
keelson on the centre line of the boat, they then go up, over the top and
are secured with a lanyard to an eye fixed to the stringer.
To secure the tank
down I used webbing strap, similar to my jackstays... In fact they were once
my old ones! The pic left shows the straps where they cross the
keelson on the centre line of the boat, they then go up, over the top and
are secured with a lanyard to an eye fixed to the stringer.
 End of webbing, with
lanyard fixing.
End of webbing, with
lanyard fixing.
 Large pre painted ply
backing pads, plenty of Sikaflex and a willing helper needed to make up the
strength to fasten the deck fittings down.
Large pre painted ply
backing pads, plenty of Sikaflex and a willing helper needed to make up the
strength to fasten the deck fittings down.
 Pads in place and
fitting offered up, not fixed as yet.
Pads in place and
fitting offered up, not fixed as yet.
 The
tank also needs an air breather, dire warnings are given about the size of
this, saying it must be the same size as the Pump out, i.e. 1 & 1/2 inch.
That is crazy. Even though there is an activated charcoal filter in
the little grey plastic tub, there is a free flow of air through it and when
you are pumping out there will also be a 3/4 inch flush connector open on
deck, so I see no chance of the tank imploding!
The
tank also needs an air breather, dire warnings are given about the size of
this, saying it must be the same size as the Pump out, i.e. 1 & 1/2 inch.
That is crazy. Even though there is an activated charcoal filter in
the little grey plastic tub, there is a free flow of air through it and when
you are pumping out there will also be a 3/4 inch flush connector open on
deck, so I see no chance of the tank imploding!
 The Pump had to be moved
a few inches from it's original position and the direction of the inlet and
outlet rotated one flat, easy job, fitting the pipes was not! It was
cold out in the barn and I only had a flask full of hot water, not hot
enough! I ended up boiling pans of water, then it was easy, once the
pipe had gone all floppy. however the odour proof pipe is not anything
like as strong as the old spiral wound stuff. I managed to break it several
times. To get more space and leverage I took the loo door off so two
of us could get to the pipe at once. It had a life of it's own!
The Pump had to be moved
a few inches from it's original position and the direction of the inlet and
outlet rotated one flat, easy job, fitting the pipes was not! It was
cold out in the barn and I only had a flask full of hot water, not hot
enough! I ended up boiling pans of water, then it was easy, once the
pipe had gone all floppy. however the odour proof pipe is not anything
like as strong as the old spiral wound stuff. I managed to break it several
times. To get more space and leverage I took the loo door off so two
of us could get to the pipe at once. It had a life of it's own!
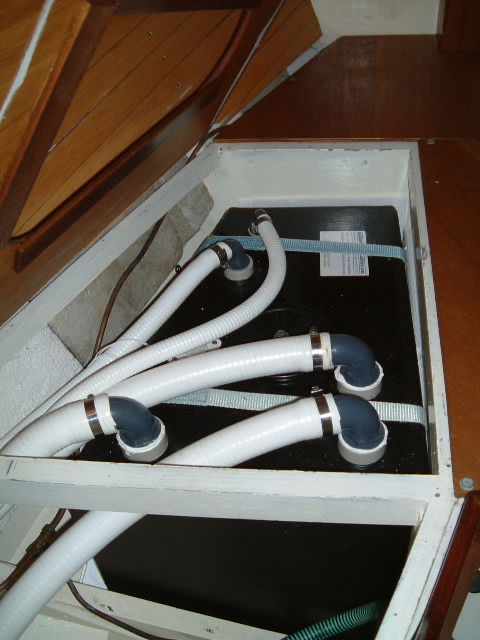
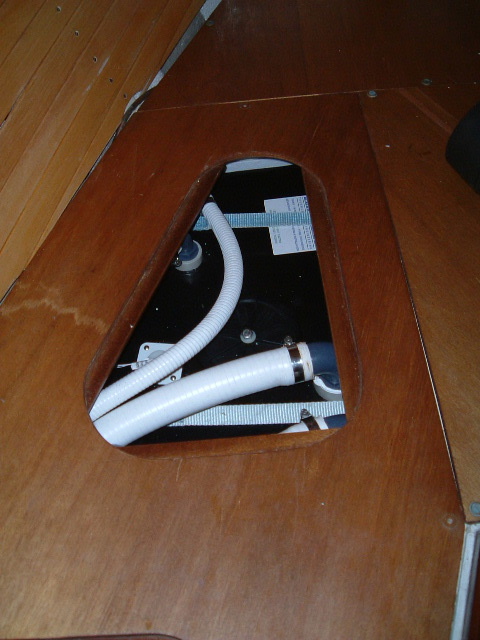
 The pipe work all in
place, I used an awful lot of s/s jubilee clips! Seacock's double
clipped too. In this pic you can also see the little fold down basin.
the waste pipe has that valve on it that you can operate to release the loo
vacuum, very useful.
The pipe work all in
place, I used an awful lot of s/s jubilee clips! Seacock's double
clipped too. In this pic you can also see the little fold down basin.
the waste pipe has that valve on it that you can operate to release the loo
vacuum, very useful.
 Close up of the pump and
it's valves. You have the choice of where you pump from, the tank or
the loo and above, where you pump to, the tank or the sea. Once you have
that in mind it is no more complicated than before really. It takes up
a little room on the bulkhead, but does not protrude any more into the
compartment than it used to, so elbow room is the same.
Close up of the pump and
it's valves. You have the choice of where you pump from, the tank or
the loo and above, where you pump to, the tank or the sea. Once you have
that in mind it is no more complicated than before really. It takes up
a little room on the bulkhead, but does not protrude any more into the
compartment than it used to, so elbow room is the same.
 Looks like a plumbers
nightmare, but I have used a few plastic pipe clips since to pull the pipes
closer in to the sides. none of the fittings at the back 'get in the
way', as they are behind the loo!
Looks like a plumbers
nightmare, but I have used a few plastic pipe clips since to pull the pipes
closer in to the sides. none of the fittings at the back 'get in the
way', as they are behind the loo!
![]() At the tank end, pipes
had to be lead through holes in bulkheads and out of harms way.
At the tank end, pipes
had to be lead through holes in bulkheads and out of harms way.
 Hose clips in place, all
strapped down.
Hose clips in place, all
strapped down.
 Bunk top replaced and
screwed back down. there is a small space above the tank, but not
really a storage space.
Bunk top replaced and
screwed back down. there is a small space above the tank, but not
really a storage space.
 You would not know the
tank was there would you!
You would not know the
tank was there would you!
 With all back in place,
and the loo having been tested, filled and emptied, pump worked in all
directions, all works like a dream. I used 90 degree bends near the
pump, to fit it in the space, it would have been better to use swept bends,
but they would not fit. So far we cannot find a fault with the system.
I would recommend it to everyone. It certainly gets Darian's vote, no
more tripping up to the loo at night in the Marina!
With all back in place,
and the loo having been tested, filled and emptied, pump worked in all
directions, all works like a dream. I used 90 degree bends near the
pump, to fit it in the space, it would have been better to use swept bends,
but they would not fit. So far we cannot find a fault with the system.
I would recommend it to everyone. It certainly gets Darian's vote, no
more tripping up to the loo at night in the Marina!
I would recommend Lee Sanitation, they have their own website, http://www.leesan.com/
They publish drawings of all different setups for tanks, but having a Lavac helps, you already have the pump!
John Williams