The Eventider's News


Issue Ten.  Spring/Summer 2008 


Page No 4

Owners Tips


Site Home Page

Page 1    Sailng in Africa    Sailing in Africa II     Therapist     Scran Bag! 

Paint Offer    The webmaster    The Burgee    Events    News

  Back issues - 1   2   3   4   5   6  7  8  9

Hit Counter
     

Trim Tabs to an Eventide!??


When I re-launched Fiddlers Green in the spring of  2008 she had an odd appendage on her transom, see left.

I had been toying with this idea for several years and had just not got round to doing it, time and all that.  This year, as there was precious little to do at fit out time, there was no excuse.


Why fit them?

Well for years I had noted that with 2 or 3 people in the cockpit, at full throttle FG squatted her transom enough to get the helmsman's feet wet, by the water rising up the transom drain.  The drains are above the static waterline and the cockpit floor is 6" plus above the static waterline.  However when all the horses are unleashed from the Beta 17 then the water can rise halfway up the transom, seemingly.  Certainly I have a tide mark 9" up sometimes.

So I thought, what if I widened the transom, to give more lift....daft idea...!


The alternative was a pair of foam wedges glued to the underside.  If I used closed cell foam it would have a very slight buoyant effect, very slight, about 20lb!  however closed cell would not get waterlogged and could be easily shaped.


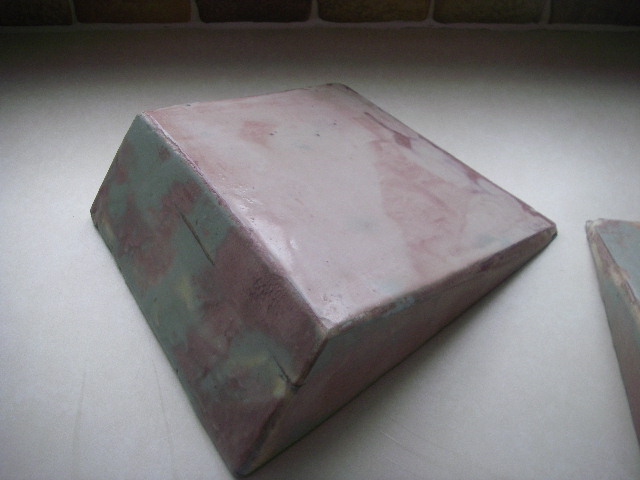
I chose to use builders insulating foam slab.  If I cut out several bits and glued them on top of one another I could carve them with a knife.... cost about £10.00 for a small slab.  I made them about 3" deep at the aft end and to fit from the WL each side down to the flat section of the underside of the hog.

They had to be a matched pair, so were glued together with epoxy, filled and faired, sanded and further epoxy coated, till I was sure they were as good as identical.


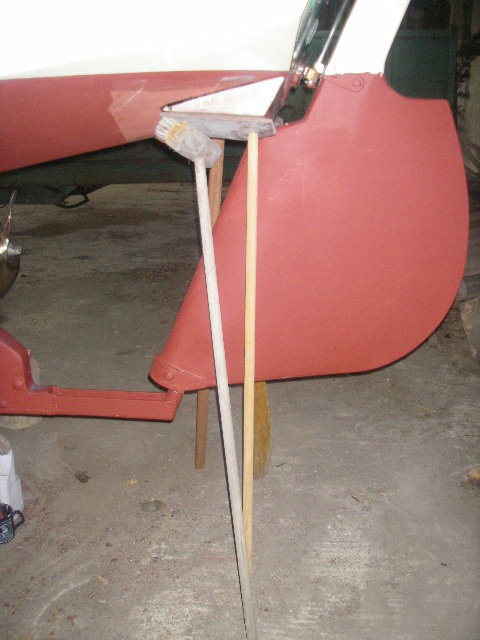
I also figured that if I stuck it to the underside of the transom with Sika-Flex, I could easily cut them off if it was a disaster, with a sharp knife.

to hold them in place for long enough for the Sika-Flex to set, I used  brooms and sticks with  ply wood packing pieces to spread the load and not crack the epoxy on the foam.  This was tricky, as if you did not get the support in the correct place, they gently slid!  Messy too, Sika-Flex is very sticky stuff!


As you can see it was simple enough.  I waited with the boat to make sure they did not slide when I turned my back though!


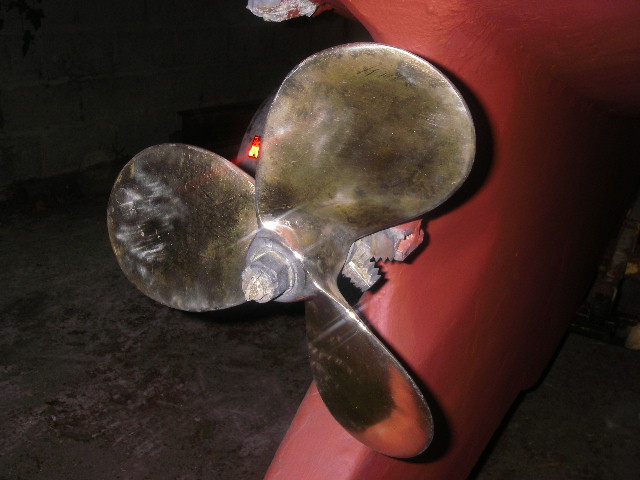
Whilst I was waiting I made myself useful by polishing the prop!  I always polish it up and for the last two years have coated it in Lanolin after I have finished.  This appears to lessen the amount of limescale deposit, and what was there after the previous year, came off easily.  I never have a barnacle on the prop. Last year there was a giddy one on the end of the prop nut!  How do they hang on there!


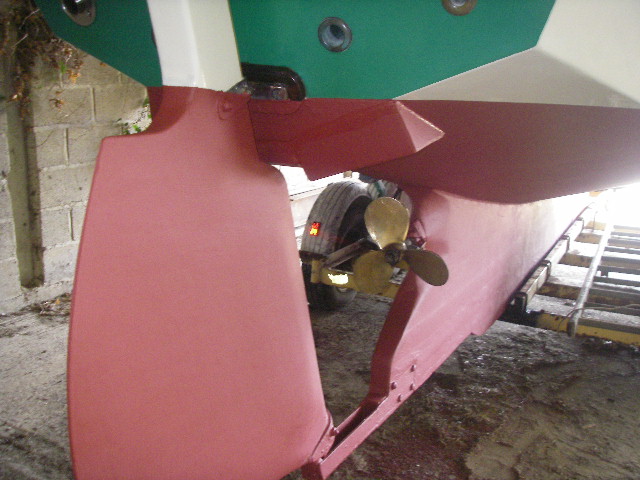
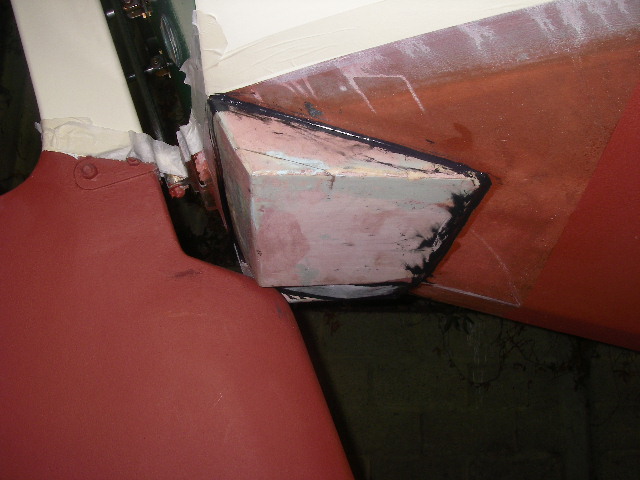
Chocks away and the wedge is glued in place!  You can just make out the two layers of foam.  Note the edge nearest the camera is still under the WL.


There was a  gap between the two wedges and I decided to part fill it with a thinner wedge.  The rudder has a leading edge that slots into this area, so I could not make it the full depth.  I trimmed a bit of foam on site to fit, then coated it with epoxy and it just held itself in place with Sika-Flex.


Here you can see the thinner wedge in the centre, above the leading edge of the rudder.  When all was in place I then went all the round with Sika-Flex filling all the edge voids and fairing off.


Looks a bit messy, but in fact it was as smooth as a babies bum really!


Anti-fouled and almost ready for the water.


But did it work?
     
    An Emphatic YES!

At full throttle, about 6 knots, instead of wet feet there is now a 2" drop down the drain to the W.L.  We therefore have raised the stern at speed by about 3". Just what I wanted to do.

There is a slight gurgle from the wedges when sailing, but no noticeable effect on either speed or weatherhelm, one of my worries. A speed buff would tell me the wedges must take 0.001 knot off my top speed,   Really?  As if I worry.  Having dry feet sounds better to me!

John Williams


    Mast raising and Lowering, made easy!
     

An article by Ex Eventide Owners David Cooper.


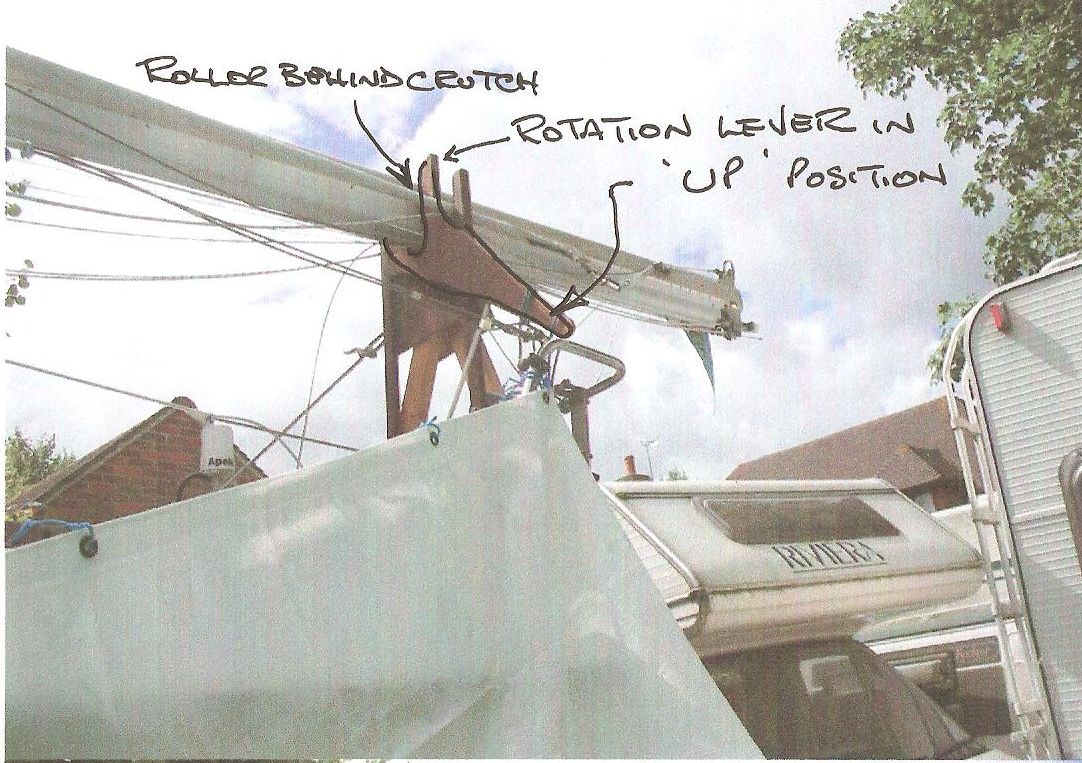
"MOONBEAM"  SeaMaster 23S , Single handed , Mast Raising & Lowering operation

Raising

  1. With mast resting in Fwd & Aft crutches, release all tie down ropes
  2. Remove tarpaulin, Note Mast must lay with the Easy Reef lying to Srbd.
  3. At Aft Crutch , fit the Rotation Lever from the stbd side of Mast, fit Pivot bolt thru stbd pivot hole on Aft crutch.
  4. Turn the Rotation lever Anti-clockwise by 90 degrees, Mast will now be standing vertical to the Crutch platform.
  5. At the Fwd Crutch Tie Mast in this position to stop any further rotation
  6. Remove pivot bolt, slide the Mast & Rotation Lever to Port side and insert Pivot Bolt into port pivot hole and secure with nut and location pin into fwd face of Aft crutch
  7. Assemble "A" Frame with joining bolt ,link ,shackles and Main Sheet
  8. Guy "A" frame in near vertical position with ropes.
  9. Fit Spreaders to mast, release securing rope at Fwd crutch
  10. Make a rope bridle and attach to foot end of mast, connect with the Mainsheet
  11. With Mainsheet, lift the foot of Mast and it will slide aft on the roller fitted to Aft crutch ,until Spreaders are against the Aft crutch,
  12. remove Centre Crutch
  13. Lower Mast into the tabernacle and fit aft bolt thru foot of mast block
  14. Attach Cap Shrouds to chain plates, leave them a little slack
  15. Remove bridle and Mainsheet from "A" frame.
  16. Attach Backstay to Transom tensioner bottlescrew
  17. Lay "A" frame aft onto mast, remove guys
  18. Attach Forestay to Link on "A" Frame with a shackle,
  19. Pull out drive pin on winch to FREE position, keep slack to a minimum , attach Electric Winch Cable Hook, to link (fwd side) with another shackle, reeve a Safety rope from eye in forestay over link thru hook in winch cable and lay on deck alongside Samson post
  20. Remove Fwd Crutch, lay out remaining shrouds alongside mast, check all halyards are on correct side of mast spreaders.
  21. Check cable from winch runs thru pulley block attached to anchor roller on stem fitting, rig electric cables for winch to battery in Fore cabin and motor on winch.
  22. Operate Electric winch hand control to take up slack in cable, ensure winch drum is not crushing other turns on it
  23. Lift Mast into position, checking that Cap shrouds are not fouling anywhere, keep the safety rope tight around the SAMSON post all the time , so that should a stop be required the winch will not run away.
  24. Fit Fwd bolt in tabernacle
  25. Attach shrouds and tighten all bottlescrews to tension mast, ensure verticality of mast.
  26. Dismantle "A" frame and stow in Pulpit cradles
  27. Winch cables, Electric, stow away in Fore cabin after disconnection from battery.
  28. Fit Boom and associated rigging thru to cockpit
  29. Attach strop to Jib Furler Drum and reeve reefing line thru pulleys to cockpit
  30. Easy Reef mainsail, pull up halyard until snug but NOT overtighten
  31. before deploying Mainsail pull hard on reefing line first, then pull on deployment line until desired amount of sail is attained.
  32. ENJOY SAILING
  33. Lowering mast
  34. Disconnect Jib foot from strop and haul up mast with Halyard until drum is level with mast foot
  35. Remove Boom and all sheets etc.
  36. Assemble "A" frame , connect with Forestay, winch cable hook , Mainsheet and reeve the Safety line and secure it to SAMSON Post
  37. Make electrical connections to winch.
  38. gather halyards etc to mast
  39. Disconnect Lower Shrouds,& stow on mast
  40. Remove Fwd Tabernacle bolt, mast will lay back on "A" frame  winch cable.
  41. After Crutch, ensure that Rotation Lever is in the correct position and secured
  42. Adjust cap shrouds and keep checking whilst lowering mast
  43. Start lowering mast, just a little at a time holding the safety line tightly to the SAMSON Post to keep the winch running slowly
  44. Mast down in Rotation Lever, attach a safety rope to crutch & mast
  45. Before removing Aft Tabernacle bolt attach a safety line to foot of mast and secure to SAMSON Post.
  46. Refit Fwd Crutch in position
  47. Remove AFT Tabernacle bolt
  48. Using Mainsheet lift mast foot with a bridle, as before, and then with winch start pulling mast Fwd (Forestay still attached)
  49. Refit Centre Crutch in position
  50. Reposition "A" frame and guy to about 45 degrees fwd, reposition mainsheet bridle aft on mast and continue pulling mast until over stemhead fitting , lower mast on to Crutch and secure in position.
  51. Disconnect Cap Shrouds, Mast Spreaders & Backstay, stow on mast
  52. Lower "A" frame to mast and dis-assemble, forestay, mainsheet, safety line & bridle Stow "A" frame arms in Pulpit cradles, stow mainsheet, safety line & bridle away in 5th Berth
  53. disconnect electric winch cable/control box, from battery and then from motor, stow in fwd cabin
  54. Re arrange anchor chain, winch, pulley and hook ,NOTE when rewinding cable on drum ensure that the turns do not crush one another
  55. At Aft Crutch, Remove pivot bolt , slide mast to original position and refit bolt in stbd hole
  56. Move Rotation Lever clockwise direction until mast is laying flat on crutch
  57. Remove rotation lever and stowaway.
  58. Tidy away all shrouds, halyards etc on mast
  59. Place boom on to centre and Aft Crutches
  60. secure mast etc to crutches
  61. Refit tarpaulin


    There sounds easy !  David has taken all the heave ho out of it with a bit of clever application.  well done.
     
    As a post script I mailed David and he sent this....

'The winch I bought thru EBay for £60, there many different types but this one has a straight pull of 1000 lbs. I also purchased a deep cycling 80Amp battery for it which is placed in a box on the fore cabin floor and locked in place and is solely for use with the winch, I can also us it for anchor raising. Re-charging is achieved with a small generator.'